Using BLE technology when working with beacon in React Native
Contents
In the last article we have already discussed how useful beacons and BLE technology for business are. Today let's move to practicing and consider how exactly iBeacon and BLE can be used in React Native, namely with the help of the React Native BLE library.
How to implement this technically?
If you decide that you want to use this solution in your project, you will need
1
Beacon: Select a suitable BLE beacon that meets your range requirements. You can find a large number of beacons on Aliexpress, we used HOLY-IOT.
2
BLE-enabled smartphone or tablet: A device to test and use your application that is compatible with Bluetooth Low Energy technology. For our solution, iPhone with iOS 9.0 and higher, Android with 7 and higher are suitable.
3
Development tools for your application, such as VSCode, as well as React Native and the react-native-ble-plx library.
Now you can start implementation.
Data collection
To collect RSSI data we will use the `react-native-ble-plx` library. We use the startDeviceScan method. This method allows you to scan BLE devices within range and obtain information about them, including RSSI. Here's an example of how you can implement RSSI data collection for specific devices:
import { BleManager } from "react-native-ble-plx";

const NAME = "HOLY-IOT";

const bleManager = new BleManager();

// Function to start scanning BLE devices
function startScanning() {
  // The first parameter is the UUIDs of services (null if you want to scan all devices)
  // Second parameter - scanning options
  // The third parameter is a callback called when a device is detected
  bleManager.startDeviceScan(null, null, (error, scannedDevice) => {
    if (error) {
      console.warn(error);
      return;
    }

    if (scannedDevice && scannedDevice.name === NAME) {
      console.log(scannedDevice.name, scannedDevice.rssi); // to find the device we need
      // hereinafter we will process RSSI
    }
  });
}
// Stop scanning if necessary
function stopScanning() {
  bleManager.stopDeviceScan();
}
Also be sure to request location permissions if you're on Android, as this is required to scan BLE devices starting with Android 6.0 (API level 23).
In this example, all available BLE devices are scanned every time a device with a given UUID is detected. The console will display the device name and its RSSI.
Please note that Bluetooth on iOS and Android may require permissions and privacy settings, including a request for location access and an explanation of why your app needs this permission in the `Info.plist` (iOS) and `AndroidManifest.xml` files (Android) respectively.
Distance estimation based on RSSI
To calculate the distance between the BLE device and the beacon based on the RSSI value, we use this formula:
где:
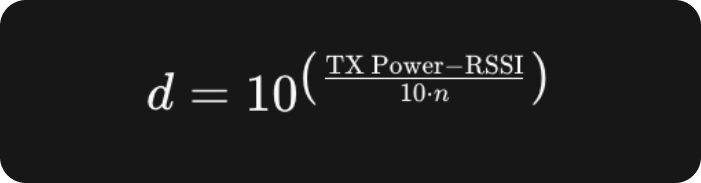
d — distance to the device (beacon),
TX Power— signal power measured at a standard distance (usually 1 meter) from the beacon,
RSSI — signal strength,
n — is the signal attenuation factor (environmental factor), reflecting the loss of the signal in the environment; typical values range from 2 to 4.
TX Power— signal power measured at a standard distance (usually 1 meter) from the beacon,
RSSI — signal strength,
n — is the signal attenuation factor (environmental factor), reflecting the loss of the signal in the environment; typical values range from 2 to 4.
This formula allows you to estimate the distance between two devices using the logarithmic relationship between the change in signal strength and distance.
The value of the signal attenuation coefficient n depends on the specific environmental conditions in which the signal is transmitted.
Open space without obstacles: An n value of about 2. This condition assumes minimal signal attenuation when there are no significant obstacles between devices and the signal can travel in a straight line.
Indoors with obstacles: The n value can vary from 2.5 to 3.5 or even higher. Indoors, the signal can be reflected from walls, ceilings and other objects, which increases attenuation. Higher values of n are used to account for this additional attenuation.
Challenging environments with many obstacles: In environments with a high density of obstacles, such as warehouses, manufacturing facilities, or urban environments with many reflective surfaces, the n value can be set in the range of 4 to 5. These environments require a higher attenuation factor to compensate for significant signal losses.
It is important to understand that determining the most appropriate value for n often requires an empirical approach. This means running tests in the target environment to measure the actual signal distribution and tailoring the attenuation factor to achieve the best accuracy in distance estimation.
What will this look like in practice?
We have already obtained RSSI values from scanning devices as shown in the previous example. Now let's add a function to calculate the distance:
function calculateDistance(rssi, measure = -69, multiplier = 2) {
  return Math.pow(10, (measure - rssi) / (10 * multiplier));
}

bleManager.startDeviceScan(null, null, (error, scannedDevice) => {
  if (error) {
    console.warn(error);
    return;
  }
  if (scannedDevice && scannedDevice.name === NAME) {
    const distance = calculateDistance(scannedDevice.rssi);
  }
});
Increasing measurement accuracy
Factors such as physical obstructions, interference from other signal sources, and hardware differences can distort RSSI. Various filtering techniques are used to improve measurement accuracy.
We will use a simple moving average method, which is used to smooth out time series data and reduce random fluctuations.
To implement this technique, we will store the last few RSSI measurements for the device and calculate the average of them.
const rssiValues = {}; // object for storing arrays of RSSI values

function addRssiValueAndGetAverage(deviceId, newValue, maxSize = 3) {
  if (!rssiValues[deviceId]) {
    rssiValues[deviceId] = []; // Initialize the array if this is the first value
  }
  const values = rssiValues[deviceId];
  values.push(newValue); // Add a new value

  // Remove the oldest value if the maximum array size is exceeded
  if (values.length > maxSize) {
    values.shift();
  }

  // Calculate the average value
  const averageRssi = values.reduce((acc, value) => acc + value, 0) / values.length;
  return averageRssi;
}

bleManager.startDeviceScan(null, null, (error, scannedDevice) => {
  if (error) {
    console.warn(error);
    return;
  }
  if (scannedDevice && scannedDevice.name === NAME) {
    const averageRssi = addRssiValueAndGetAverage(scannedDevice.id, scannedDevice.rssi);
    console.log(`Average RSSI value for device ${scannedDevice.name}: ${averageRssi}`);
  }
}); // Here you can use the average RSSI value to estimate the distance } });
Why did we do all this?
It is worth noting that this method allows you to achieve an approximate estimate of the distance to the beacons. Despite the introduction of algorithms to improve measurement accuracy, it must be recognized that the results obtained remain approximate. Also, a feature of this implementation is that it works only when the application is in the active state (foreground state), which imposes certain restrictions on the scope of its application.
However, even in its current form, this system can find wide application in various scenarios. Examples include localization and navigation indoors, such as shopping malls, museums, warehouses, where it is important to provide users or employees with information about nearby objects and traffic routes.
In the future, we plan to develop an improved version that will be able to function not only when the application is active, but also in the background state. This will expand the scope of the technology, making it suitable for real-time monitoring and tracking tasks without the need for constant user interaction with the application.
The development and improvement of the tracking system using BLE and RSSI opens up new prospects for creating effective and convenient solutions in a variety of areas, from retail to food tech, providing a new level of user experience.
In the next article we are moving on to a more advanced approach for working with beacons - let's develop a native module for iOS.
In the next article we are moving on to a more advanced approach for working with beacons - let's develop a native module for iOS.
You may also like

Guide to Cross-Platform Development Using React Native
Maria S, Lead Mobile Developer
Integration
React
Technology
01.03.202414 minutes

React Native Splash Screen - support for different themes
Ilya M, mobile developer
API
Code
iOS
08.12.202313 minutes

IoT in FoodTech: Unlocking Opportunities for Businesses
Natalie S, communications expert
Foodtech
Integration
Technology
E-commerce
Delivery
26.01.20249 minutes

AI in foodtech: plans, ideas, features
Natalie S, communications expert
Foodtech
Technology
AI
Restaurant
Delivery
25.07.202310 minutes

FoodTech mobile apps: What is important to know about?
Natalie S, communications expert
Foodtech
Integration
Technology
Restaurant
Delivery
30.01.202413 minutes

Improving User Experience: Efficient Image Loading Using Progressive Display
Andrey M, frontend developer
Technology
Images
User experience
28.08.20236 minutes
